Olympus OM 35mm film system close-up and macro equipment
Trans-Illuminator LSD
Introduction
The Trans-Illuminator was produced by the Microscope Division of Olympus, and was designed for use with a stereo microscope or a compound microscope. The lamp housing can be adjusted vertically on a column attached to a heavy metal base. It can be tilted around a horizontal axis on a short horizontal arm.
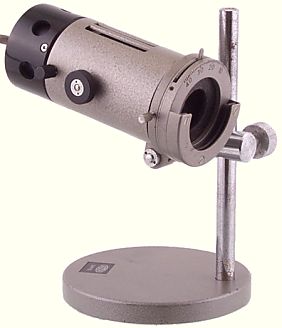
Olympus LSD Trans-Illuminator
The Trans-Illuminator can be used for various types of lighting with OM macro equipment, including:
- Transmitted lighting with the Trans-Illuminator Base, the Centering Mirror and the Clear Stage Glass, the Stage Plate 28 or the Stage Plate 45.
- Shadowless incident lighting with the Trans-Illuminator Base, a Lieberkühn Reflector and the Shade Stage Plate.
- Coaxial incident illumination with a Mirror Housing.
| Transmitted lighting | Shadowless lighting with Lieberkühn Reflector | Coaxial lighting with Mirror Housing |
Requires a transformer. A lead from the rear end of the lamp housing terminates in two 4 mm “banana” plugs that fit the 4 mm sockets on the rear of the transformer.
To fit a new bulb, loosen the black fixing knob for the bulb holder, and pull the holder out of the back of the Illuminator. Hold the bulb with a cloth to avoid getting finger marks on it. The 6 v 30 w bulb (Olympus reference TB-1) has a bayonet fitting – push and turn anti-clockwise to remove a bulb; push and turn clockwise to fit a bulb. Push the bulb holder into the back of the Illuminator, and tighten the fixing knob.
Each time that you fit a new bulb, you need to centre it:
- Adjust the Illuminator on its column so that the body is horizontal.
- Point the Illuminator at a right-angle to a light-coloured vertical surface.
- Open the iris diaphragm to its maximum.
- Connect the Illuminator to the transformer.
- Turn on the power.
- Slowly increase the voltage until you can clearly see the bright patch on the vertical surface.
- Use the focusing knob to bring the coiled filament of the bulb approximately into focus (don’t expect a bitingly-sharp image).
- Use the two coaxial centering knobs to bring the image of the filament approximately into the center of the bright patch.
You should not need to adjust the centering until the next time you fit a new bulb.
To focus the Illuminator, turn the focusing knob on the side of the Illuminator until the image of the bulb’s filament is projected sharply onto the subject. Then turn the focusing knob clockwise until the illumination is even.
The combined iris diaphragm and filter holder assembly on the front of the Illuminator can be rotated (after slightly loosening the chrome fixing knob) so that the filter holder is at the bottom. The assembly can be removed by loosening the fixing knob further. To replace the assembly, locate the circular groove at the rear onto the two metal points, and then tighten the fixing knob. The filter holder accepts the rectangular filters designed for it, and also the circular filters for the Epi-Illuminator.
| Base diameter | 119 mm |
|---|---|
| Column height | 169.5 mm |
| Bulb | 6–8 Volt 5 Amp TB-1 |
| Connecting lead | 1400 mm |
| Connecting plugs | 4 mm “banana” plugs |
| Iris diaphragm | 17 blades |
| Iris aperture | 3–43 mm |
| Filter sizes | 60×45 mm rectangular 45 mm circular |
| Microscope ref. | LSD |
| US stock no. | 104-142 |
| Introduced | 1972 (available earlier for use with microscopes) |
| Discontinued | |
| 1978 US price | $150.00 |
| 1988 US price | $288.00 |
| 1978 UK price | £106.00 + VAT |
Versions
The version that was sold for use with the OM system is finished in a “hammered” medium grey, similar to the grey parts of the Auto Bellows and various other OM macro equipment.
There are two other versions, differing only in the colour and finish of the non-chrome metallic body parts, designed to match Olympus microscopes of various vintages. The older version is finished in a smooth, glossy grey, and the newer version is finished in a smooth, semi-matt cream.
Accessories
Supplied with a 60×45 mm B-76 Heat Absorbance Filter (blue cobalt glass) for protecting delicate specimens from heat, and 3 bulbs. Requires one of the Olympus transformers. A range of filters was available.
Bulbs – Specification and Alternatives
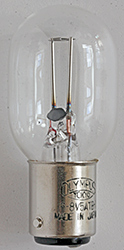
| Base | SBC (Small Bayonet Cap) BA15d (15 mm Double Contact Candelabra Bayonet) |
|---|---|
| Rating | 6–8 Volts 5 Amps 30 Watts |
| Designations | Hosobuchi OP2118 MicroscopeBulb.com MXA20315 Nikon 77904 Olympus TB-1 Olympus 8-C101 SM-8C101 Ushio 8C101 Ushio 8000241 SM-77904 |
Instruction booklet
Reproduced with permission from the copyright owner, Olympus Optical Co., Ltd
UNIVERSAL ILLUMINATOR MODEL LSD WITH TRANSFORMER TC
NAME OF PART
![]()
|
|
FEATURES
- Vertical movements and rotation of the illuminator along the column can be adjusted as required.
Vertically … range of 150 mm Rotation … 360° - Ventilated lamp house insures long bulb life.
- The 18mm travel of the condenser rack and pinion permits adjustment of the light beam to converging, diverging and parallel, as desired.
- Field diaphragm, on which filter holder is provided, can easily be removed and replaced. Diaphragm is adjustable from 2–42 mm.
- Centering is easy by means of the two centering screws.
- Rated voltage : 6V. 5A (flat filament)
- Color temperature : Approximately 2,800°K at around 7.5V.
HOW TO OBTAIN KOHLER ILLUMINATION
| Microscope used | … | Model GB |
| Objective | … | 10× |
![]()
- Close condenser diaphragm of the microscope.
- Set the mirror of the microscope with its plane surface upward.
- Place the LSD illuminator facing the microscope. (The distance between the microscope and illuminator varies from 15–50cm according to the type of objective used. Namely, with the low power objective, place the illuminator close to the microscope, and with the high power objective, place it further from the microscope).
- Look at the mirror and set the image of filament to the center of the condenser diaphragm on the mirror by adjusting the angle of the illuminator.
- Open the condenser diaphragm.
- While looking through the eyepiece, close the field diaphragm of the illuminator to an aperture to produce a ring within the field.
- Focus the ring by moving the condenser of the microscope up and down.
- Bring the ring to the center of the field by adjusting the mirror.
- Open the field diaphragm of the illuminator.
- Remove the eyepiece.
- Close the condenser diaphragm.
- While looking through the eyepiece tube, focus the diaphragm (small ring) by the condenser adjustment knob.
- Look at the mirror and set the image of filament to the center of condenser diaphragm on mirror by means of the two centering screws of the illuminator.
- Replace the eyepiece.
- Now you have obtained Köhler illumination.
IMPORTANT:
Once Köhler illumination has been obtained DO NOT MOVE either the microscope, illuminator, or mirror. Movement of any of these will impair Köhler illumination, and you will have to start from the beginning again.
NOTES:
- With low power objective, particularly with the 4× objective, the field is often illuminated unevenly. In this case, adjust the lighting in the following manner.
- First obtain Köhler illumination with the 10× objective according to the mentioned procedure, then switch to the 4× objective by rotating the nosepiece.
- Remove the condenser, screw off the top tens and return the condenser to its mount.
- Condenser.
The numerical aperture of Olympus two-lens condenser is 1.25 when oil is used for oil immersion microscopy, otherwise it is N. A. 1.0–0.9, and N. A. 0.65 without the top lens.
HOW TO OBTAIN CRITICAL ILLUMINATION
This illumination is most desirable for observation with the 100× objective.
- First obtain Köhler illumination with the 10× objective according to the procedure described above.
- Switch to the 4× objective by rotating the nosepiece.
- While looking through the eyepiece, produce a clear image of filament on the center of the image of specimen by means of the lamp house condenser focusing adjustment knob of the illuminator.
- Now you have obtained critical illumination.
- Change objective to higher magnification as desired by rotating the nosepiece.
NOTE: When objective is changed to a higher magnification the image of filament is no longer seen in the field. However, as long as the image of the filament is sharp focus with the 4× objective you are observing under critical illumination.
OLYMPUS
OLYMPUS OPTICAL CO., LTD.
3-7 Kanda-Ogawamachi, Chiyoda-ku, Tokyo, Japan
Filters
Seven rectangular filters, size 60×45 mm, were available for use with the Trans-Illuminator:
- Color Balance Filter G-53
- Green, for increased contrast with some subjects and black-and-white film.
- Color Balance Filter Y-48
- Yellow, for increased contrast with some subjects and black-and-white film.
- Color Temperature Filter LB-45
- Blue, mired shift −45, for use with artificial light colour transparency film balanced for 3200°K or 3400°K and transformer at 6 volts. This correction is equivalent to a Kodak Wratten 82C filter, which also gives a shift of −45 mireds.
- Color Temperature Filter LB-100
- Blue, mired shift −100. This correction is approximately equivalent to a combination of Kodak Wratten 80C+82A filters, which gives a shift of −102 mireds.
- Color Temperature Filter LB-200
- Blue, mired shift −200, for use with daylight colour transparency film balanced for 5500°K and transformer at 6 volts. This correction is approximately equivalent to a combination of Kodak Wratten 80C+80B+82 filters, which gives a shift of −203 mireds.
- Diffusion Filter WF
- Diffuses the light for softer illumination, transmitted or reflected.
- Heat Absorbance Filter B-76
- Blue cobalt glass, for protecting delicate specimens from heat. Supplied with the Trans-Illuminator
The circular 43 mm and 45 mm filters for the Epi-Illuminator can also be used. When these circular filters are used, the iris diaphragm in the filter holder of the Trans-Illuminator needs to be closed a little to prevent unfiltered light from reaching the subject.
Send comments or questions to Alan Wood
![]()
Created 18th May 2001 — Updated 13th April 2026
Copyright © 2001–2026 Alan Wood