Olympus microscopes and photomicrographic equipment
SC 35 Type 12 microscope camera
Introduction
The SC 35 Type 12 body is a modified version of the OM101 (which was known as the OM88 in North America). It was designed for use with the Photomicro Adapter L and Olympus compound and stereo microscopes, or with the Photomicro Adapter H2 (PM-CAMS2) for use with Olympus colposcopes and operating microscopes.
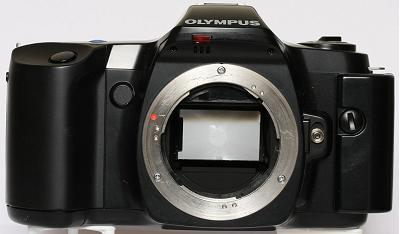 |  |
| Olympus SC 35 Type 12 – Front | Manual adapter |
 |
|
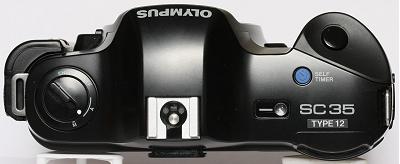
| Olympus SC 35 Type 12 – Top | |
The differences from the OM101 include:
- Power Focus mechanism is not included.
- Backlight compensation button is not included.
- P (program) setting is not included on the mode dial.
- Flash shoe is a plain hot shoe, with no connections for controlling T-series or F280 flashes. (The SC 35 Type 9 and Type 15 have T-series connections.)
- PC X-synch flash socket instead of release button for Power Focus lenses.
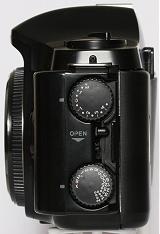
- Exposure compensation dial, providing +2 to −5 stops, in ½ stop increments, instead of aperture dial on Manual Adapter 2. (There was another version providing +2 to −4½ stops, in ½ stop increments.)
- Focusing screen 1-12 instead of split-image and microprism.
- Remote release socket on the side of the camera, for the M Remote Cord 1.2 m or 5 m.
- Socket on the bottom of the camera, possibly for a 6 volt DC supply, but the plug from the Power Pack 2 does not fit.
The non-interchangeable Focusing Screen 1-12 makes the SC 35 Type 12 suitable for use with the Auto Bellows or the Telescopic Auto Tube 65–116 and the 20 mm and 38 mm bellows macro lenses. To fit the Auto Bellows, a 7 mm Extension Tube (manual or automatic) needs to be fitted to the SC 35 body so that the release lever on the camera body mount does not foul the overhanging pentaprism. To fit and remove the Telescopic Auto Tube, its tripod collar needs to be loosened so that it does not foul the base of the camera.
| Microscope ref. | SC-35-12 |
|---|---|
| Olympus no. | 7-C563 |
| US stock no. | |
| Introduced | |
| Discontinued | |
| 1990 UK price | £379.00 + VAT |
Versions
There were 3 other versions of the SC 35, differing in the focusing screen and the hot shoe; none of them are suitable for microscopes. Type 9 was fitted with Screen 1-9 (for endoscopes), Type 11 was fitted with Screen 1-11 (for macro photography), and Type 15 was fitted with Screen 1-15 (for fibrescopes and borescopes). The 1-15 screen was not available separately.
Alternatives
The OM-2(N), OM-2SP and OM-4(Ti) can be fitted with the Focusing screen 1-12 and the Winder 2, to provide most of the functions of the SC 35 Type 12.
Going digital
It is not possible to convert the SC 35 to digital operation, so it needs to be replaced by a digital camera and a simple adapter. The best replacements are full-frame digital SLR and mirrorless cameras such as the Canon EOS 5D Mark II, 5D Mark III, 5D Mark IV, 6D, 6D Mark II, RP and R8. In these cameras, the sensor is the same size as 35 mm film and so you can continue to use your NFK 2.5× photo eyepiece.
You can also use a camera with a smaller APS-C sensor, for example the Canon EOS 7D, 40D, 50D, 600D (Rebel T3i) or 1100D (Rebel T3), but the field of view will be reduced unless you use an NFK 1.67× photo eyepiece; unfortunately these are uncommon and expensive.
Cheap adapters that allow a Canon EOS to accept Olympus OM lenses are readily available on eBay, and these adapters are also suitable for use with microscope adapters.
Instruction leaflet
These instructions are from a document entitled “Light Microscope Cameras” prepared by R. Briggs.
Olympus SC 35 Camera
Camera Information
This camera can be used for 35mm film (color-, B&W- or slide-film). The camera will be attached to a light colored OM mount (Photo Micro Adapter L).
Startup
- Take the camera with mount out of the protection bag.
- Attach the camera to an ‘Olympus’ compound microscope or to an ‘Olympus’ dissecting microscope:
- loosen screw of adapter;
- place adapter with camera on top of the microscope;
- tighten screw of adapter to fasten it to the microscope.
- Set the mode dial on top of the camera to “A” (automatic) or “M” (manual) to turn on the camera.
Loading the Film
The camera has a provision for automatic film speed (ISO) setting and first frame positioning.
- Make sure your film is DX-coded.
- If there is a Vari-Magnifinder attached to the camera, remove it by sliding it towards the top of the camera.
- To open the back, push the lever on the side to open.
- Insert the film cartridge into the camera and pull the leader out to the red line. Confirm that the sprockets are caught.
- Close the camera back and lock it with a click. The film will automatically advance to the first-frame position if the camera is on (if the mode dial on top of the camera is set to A or M).
NOTE:
- When audible and visual signals appear intermittently, the film is incorrectly loaded. Open the camera back and reload the film correctly.
- Film type confirmation is possible through the film window in the camera back.
Setting the Exposure
There are 3 ways to set your exposure using this camera:
- Auto exposure:
- set the mode dial on top of the camera to A (automatic);
- set the shutter speed setting dial on the side of the camera to X;
- the camera will automatically read the ASA and set the shutter speed accordingly.
- Manual exposure:
- set the mode dial on top of the camera to M (manually);
- turn the shutter speed dial on the side of the camera to the desired shutter speed.
- Bulb exposure:
- set the mode dial on top of the camera to M (manually);
- set the shutter speed dial on the side of the camera to B and shoot. The shutter will remain open while the shutter release button is depressed.
Taking a Picture
- Setup the microscope using your specimen.
- Insert the mini plug of the Remote Control Cord into the side of the camera body until it stops.
- Slide the Vari-Magnifinder over the view-window of the camera
- Pull the light path selector knob on the microscope out all the way.
- Confirm that the lines you see inside the Magnifinder are clear and distinct. If not, use the diopter ring of the Magnifinder to adjust this.
- Look through the Magnifinder and focus the image of your specimen using the focus knob on the microscope.
- Gently press the orange button on the Remote Control to release the shutter and listen for the shutter to open and close.
NOTE:
- If you do not hear the shutter close it means that not enough light is reaching the film. Check if the light path selector knob is pulled out all the way or increase the light intensity on the microscope.
- Don’t forget to take a picture of the stage micrometer which is necessary to calculate the magnification of the used system.
Exposure Compensation
- If you want to compensate for your exposure or if you want to bracket the exposure by varying the exposure time, use the exposure compensation dial (normally set to ‘0’) on the side of the camera to the desired value
NOTE:
- Set the exposure compensation dial to the ‘under’ side for specimens with a bright object against a dark background (darkfield), and set it to the ‘over’ side for specimens with a dark object against a clear background (brightfield).
Rewinding the Film
When the motor stops while winding the film, the film has reached the end. Audible and visual signals will warn you if you continue to press the shutter release button.
- Make sure that the specified number of exposures has been taken.
- Press the rewind button on the bottom side of the camera. The film will rewind automatically all the way back into the cartridge.
- When the motor stops operating, open the camera back and remove the film cartridge.
Shut Down
- Set the mode dial on top of the camera to OFF to turn off the camera.
- If necessary, disconnect the camera by loosen the screw on the adapter.
- Place camera and mount in a protection bag and store it in a safe place.
Checking Batteries
- Set the mode dial on top of the camera to CHECK.
- The audible and visual signals will tell you that the batteries are in good condition. If the battery power is low, the audible and visual signals will become intermittent. If the batteries are completely exhausted, no audible or visual signal will appear.
- Ask for help if the battery power is low or if batteries are exhausted.
Instruction book
The Olympus instruction book for the OM88 camera provides illustrated instructions for loading and unloading film, and for changing batteries.
Send comments or questions to Alan Wood
![]()
Created 23rd October 2010 — Updated 25th April 2026
Copyright © 2010–2026 Alan Wood